Thursday, May 7, 2009

Bloody Atoll. Japanese Series from Master Box is in markets now.

Master Box

Finally !!!
We waited for a new release from Ukrainian manufacurer Master Box almost 2 month.
And now we happy to hear that long-awaited Bloody Atoll Series in the stores now.
This series consist of 3 kits:
"Bloody Atoll series. Kit No 1", Japanese Imperial Marines, Tarawa, November 1943. Master Box 3542
"Bloody Atoll series. Kit No 2", US Marine Corps Infantry, Tarawa, November 1943. Master Box 3543
"Bloody Atoll series. Kit No 3", Hand-to-hand combat, Tarawa, November 1943. Master Box 3544

Kit No 1 contain 4 japanese figures, other 2 kits completed by 5 figures each.
First online shop who started to sell them is www.plastic-models-store.com - shop from Ukraine, as Master Box is too.
You can buy models here:
"Bloody Atoll series. Kit No 1", Japanese Imperial Marines, Tarawa, November 1943. Master Box 3542
"Bloody Atoll series. Kit No 2", US Marine Corps Infantry, Tarawa, November 1943. Master Box 3543
"Bloody Atoll series. Kit No 3", Hand-to-hand combat, Tarawa, November 1943. Master Box 3544

Retail price is 9.95$ for each kit.

Plastic Models Store offer set of 3 kits together, and price for this 3 kit a bit lower than if you will buy them separately.
Here is few live photos of built figures:


Monday, March 23, 2009

Live sprue photos Rolls Royce British Armoured Car 1920 1/35 Roden 801

So! Here we go!
Rolls Royce British Armoured Car 1920 1/35 Roden 801
!!! IS RELEASED !!!
Kit contait plastic parts, decals and gum tyres.

Retail Price is approx 37-45US$
Cheapest price I found was on www.Plastic-Models-Store.com
36.85$
And photos of sprues we have taken from this shop too, because there is no more photos on internet at the moment.


Molds looks good and good detailed. I believe that this should be very successful kit from Roden.
There is first their vehilce kit in 1/35.
At first look this Rolls Royce AC is ugly car.

A history of the armored car would be a multitude of sites related to his long and varied service in the British armed forces, and it is connected, strangely enough, with the airline. At the beginning of the First World War, the British military government their thoughts on the need to protect the newly-built airports against their suddenly overwhelmed by enemy troops. The Royal Naval Air Service (RNAs) are suggested to the Admiralty that a special armored cars, which are not only defensive functions, but also as a necessary support Army units in combat, and perform tasks communications and transport. In short, the Air Division of the Admiralty, the overtures to a company in the automotive industry, Rolls-Royce, the production of cars for over ten years.
In 1906 this company was the highly successful Silver Ghost, which continue to be built from the factory, while the war was already underway. Admiralty engineers developed an original armored deck just for the Silver Ghost chassis, which appeared to be successful in every respect. In December 1914 the first three cars were in the army. A rotating tower with a Vickers machine gun was on top of the armored body. Broadly, the draft proved to be exactly what was wanted, and soon the Motor Company a new order for additional cars.
With the onset of physical fighting on the Western Front soldiers were in the armored car. However, the idea of sending the car into battle, what Featured impassable mud for kilometers to miles, was intimidating from the start. The suspension of the fragility of these cars with an armored shell would never be able to survive in these conditions. The active military service this car into the ditch war was over before it had begun. Yet the war quickly spread from Europe to other regions of the world. The Middle East and Africa, where the war began for the possession of the German colonies, were the most promising for the application of the fast and relatively well-protected armored car.
Instead of guarding airfields in the area of Misty Albion, six squadrons of the newly formed Royal Naval Air Service on the hot and dusty deserts of North Africa and the Turkish province of Gallipoli, where the fighting has already been a few times. These cars were very useful weapons, and even the end of the First World War is not a point on her career. In 1920, she was the first modernization. And four years later, another. Elegant on a car, but worse than useless for a military armored car, said the wheels were against those with Full Metal disks. The shape of the tower was for an open top, and instead of a gun Vickers, a young anti-tank rifle and a Bren light machine gun were installed. There was also a smoke grenade launcher.
In the 1920s, these vehicles continue to participate in armed service in the colonies of Great Britain in cooperation with the airline, local suppression of uprisings by unarmed colonial tribes and employment in Europe has been found for them, the days of civil war in Ireland if the British government has undertaken several armored vehicles to the Irish government to the attacks by Irish Republican Army. These vehicles, with their active service until 1944 and was retired only through the full wear out of their parts.
One of the cars in the hands of one of the most well-known eccentric historical figures of the 20th Century, Lawrence of Arabia, his armored car was designed by him during his guerrilla activities and other adventures in the Middle East. During the thirties came to its end and there was a smell of war in the air. There was extensive modernization in Europe, and also in the arms of the British Army. At that time about a hundred armored vehicles were in service in the colonies. The majority (over 70) of them were in North Africa, where it soon before the Italian troops. Some others were in India, carrying out raids in the territory of neighboring Burma.
Today, some original armored vehicles of this type are in different countries around the world. They were very valuable private property for a long time, and remind us of the old days, when the first motorized blundering constructions, against a weak opponent of firearms, allowing rapid development of military technical idea and led to the emergence of more modern weapons in the mobile future.

Thursday, November 6, 2008

Assembling and painting 1/35 WWII Japanese Part1

Video from youtube how to assemble and paint WWII miniatures.

Tuesday, November 27, 2007

Airbrushing or not?!

Question
wanna start airbrushing my 1/24 scale models ---- mainly car bodies and play around with some creative details--i dont want to invest a lot but dont want junk--need something that will last and is fairly easy to maintain-- i live in an apartment i would like to use indoors,, any suggestions on what i should buy?? -is a compressor necissary -if you could tell me everything i need to finally get a good paint job!!---and if you got time is there a way to paint your models with acrilic paint with a brush and make it flawless??-or enamel--just a thought --much appricated

Answer

While I have seen some hand painted models it is a skill I have never been able to develope. Most really bang up jobs are done with airbrush. For that I would recommend a Paasche model "H". It is good, durable airbrush that is packaged with three different tips. It is cheeper than an Iwata, though some Hobby Lobby stores carry both and you can usually score one during Hobby Lobby's 40% of sales.

Acryllic paints are something that I have not gotten into and do not know much about. The advantage is that you do not have to use special thinners. Some modelers use Windex to thin. My experience is mainly with enamels. I have a friend that uses finger nail polish thinned with laquer thinner on his cars as he likes the range of colors and fine grain of the metallic/metal flake ones.

You do not have to have a compressor, some people prefer to use a CO2 bottle, but that seems somewhat expensive. Some of the discount tool companies (like Harbor Freight) stock inexpensive compressors.

Probably the most import thing to a good finish is good surface preperation. In other words a good clean. smooth surface. As I have gotten older I have developed a tendency to prime the surface and after that dries well to sand it with very fine grit paper. 3200, 2500, in that range. Afterwards I wash it and allow it to dry thouroughly. Thinning the paint is an art, not a science. That is something you just have to experiment with.

Thursday, November 15, 2007

What is the difference between satin white & gloss white paint?

Difference between satin white & gloss white paint.

There are a few different sheens of paint. High gloss, gloss, semi gloss, satin, egg shell, and flat. The difference between satin and gloss is the amount of sheen. Gloss paint is usually used for trim and cabinets and has a very shiny look. Satin is usually used for walls that get a lot of traffic and is easier to clean than a flat. Remember that the higher the sheen the more visible the flaws will be in what you're painting.

Satin White is 50% Gloss White and 50% Flat White.

There are three levels of "shininess"
Matt - not at all shiny
Silk - a bit shiny
Gloss - shiny

Thank you.

Monday, October 29, 2007

The main techniques for applying decals.

In previous my posts on this blog I have already wrote about how to glue different model parts, and you can read how to remove paint and chrome from a model and best method to remove old paint from a model.

Today we will talk about Different and basic technique for applying decals to our models.
So lets go!
For Tricky Decals - Decals that seem to not to want to lay down can be coaxed
into doing so with the following technique. WARNING - this is tricky - if you aren't careful you can make a big mess. Lift up the decal and apply a small amount of liquid cement to the model's surface with an old brush. Blow the decal down with your breath or use a light single stroke with a brush.
DO NOT TOUCH THE DECAL AGAIN!
The glue will melt the decal thus adhering it to the model. If you are careful this coes out great. If you touch the decal while the glue is setting it will smear like paint - the decal at this point it melted and until it dries is very susceptable to damage. Once it dries it will be fine. I've used this on old decals (from 1960's kits) and those tricky
German losenge patterns.
Wait 2-3 days before dullcoating - Always wait at least two days after applying decals before applying a dull or gloss laquer coat. The moisture in the decals will react badly to the laquer if you coat too soon and the decals will wrinkle.

  • Cut away all decal film you can do easily. Use a very sharp knife, don't press hard as you don't have to cut the paper.
  • Put a few drops of Micro Set into the water before you wet the decals.
  • Wet the decal, but don't let it stay in the water.
  • Apply Micro Set to the surface you want the decal.
  • Slide it there.
  • Press down with a soft brush, blot off excess water.
  • Brush on Micro Sol, press down gently.
  • Place the kit so the decal lies horizontally (if possible).
  • Let dry slightly, apply more Micro Sol, press down. Don't worry about small wrinkles, but try to smooth down large ones. The decal will contract again when it dries.
Repeat about twice.
No guarantees, but this is what works best for me.
(Posted by Urban Fredriksson)

Wednesday, October 24, 2007

Tamiya Porsche Boxster plastic model car kit review.


(More photos of the final model are bottom of this page.)

Review was made by Trygve Isaacson.

Since I have been eagerly awaited delivery of my red Boxster Arena, I thought I would try a model of the building. I have never seen a pattern in my life, so I wondered if it would all come right. It has. The following are some pointers and advice from the building, with photographs of the process and the final outcome. Regardless of whether you are waiting for your Boxster to be built, or already have, I can definitely recommend creating your own model, which has your colors. It is not very difficult, and it's fun. Let paint for drying time between work sessions; You can probably project in a handful of 1 - or 2 hours.


The kit and supplies

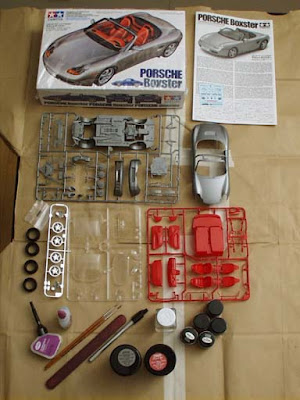
I had seen a reference to the Tamiya Model Kit (# 24187, 1 / 24 scale, 7 cm long) on the Boxster Board, so I www.tamiya.com examined, and they even had a dealer list, which Hobby Shop five minutes from my house. I listened to and noted that, in order for me and you again in a few weeks. When it came, I had no idea what would be necessary to build, but the people in the hobby shop were so friendly to fix me with the necessary project returns. The parts in the model kit actually has specific Tamiya paint figures, but you can find correspondences.

The model kit was 30 dollars. Further information: Testors 3 ounces. Spray paint cans (FS36251 Navy aggressor Gray (primer), 1247 Gloss Black, 2905 Burgundy Red Metallic, which I hope, in the vicinity of Porsche Arena Red Metallic), Testors 1 / 4 ounces. Brush on glossy enamel colors (1145 white license plates, 1147 black for many things, 1111 dark blue for chassis), Testors 1 / 2 ounces. Melting custom brush on colors (silver chrome FS17178 for chrome pipes, 1780 steel for various metallic objects, flat black for FS37078 Cabriopersenning and other objects, Turn Signal in 2723 and 2724 Amber Stop Red Light for brake lights and turn signal), 1 / 2 ounces. Cyanoactrylate (uh, Super Glue), Testors 1 oz. Clear Parts Cement (special invisible adhesive for clear plastic parts), paint thinner, nail file / sandpaper x-acto knives, small wire cutters (to cut the parts from the plastic model forms), tweezers for holding by hand into small pieces painting, kids brush (sizes 2, 0, and 5 / 0). Total cost of the kit and all the supplies to about 65 dollars.
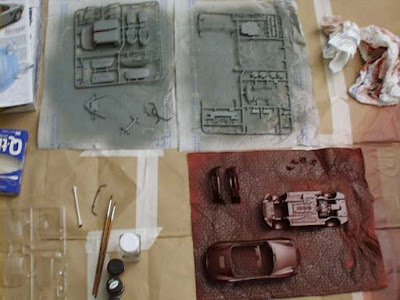
Paint primed


There are essentially three plastic parts with bars that you cut (01 mostly parts to be painted and the other parts usually painted on the outside, and with a clear plastic to left alone or spot-varnished), as well as the body, chrome parts and tires.

The first thing to do is to spray a coat gray primer on the parts, which are painted. Lesson learned: Let it dry! I have the bug starts to paint and paste some of the suspension pieces from the primer was completely dry. If you're going to glue a piece of paint or a paint primer, let it dry overnight. If additional layers of the same color to a piece, to do so may be within 3 hours after the last coat.

Color for the body pack (chassis, body, bumpers, exterior mirrors, and engine intake vents), apply several layers of the desired color. My mistake was to worry about the complete coverage on the first layer, a first in the thick mantle and some chunkiness. It is better to multiple thin layers, repeat until it is completely covered and solid. Be patient.

Once you've got the most important sections of primed and painted body color parts in your car is outside color, and it's all dry, you are ready to start cutting pieces out of the grid, from the grinding, painting and gluing.

Painting the Undercarriage


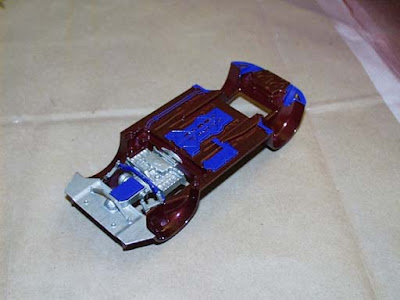
I do not know why they say blue for the chassis accents, but I follow the instructions. Is it really under blue? The engine and the rear deck are gray metal.

Assembling the Exhaust


The exhaust assembly used metal gray color for the pipes with chrome accents at the terminals. For the exhaust muffler, the color of paint instructions for something that I did not think would be until I tried it: Mix paint with chrome flasher Bernstein. The result is a somewhat tarnished chrome color. It works well for the muffler, which definitely is not too bright chrome. The stem is a separate piece from the parts chrome grille.

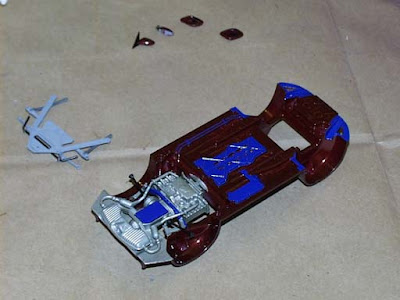
Construction of the Suspension Bridge


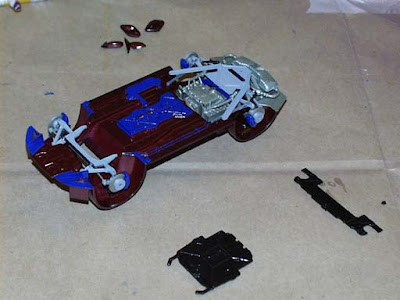
That is, if you add some complex assembly and bonding. Again, I recommend that you use the paint plenty of time to dry before you stick pieces together. Otherwise, you can use glue with a soft surface, which are not. Patience!

Follow the instructions in regard to certain items that you are not stuck together. Most important is the front suspension, which allows the wheels to turn, because they are not totally glued. You are advised to unplug from between the wheel wells and cross bars, but pivotable.

The rear suspension is the most difficult to stick. Once assembled, the entire assembly is the one on the engine and exhaust, in a large meeting, attaching at least eight points stick. It is difficult, they are all capable of quickly before the glue. I had two points glue that is not quite true, but at the end it is not really significant.

The rotors and calipers are glued to the suspension, but in each rotor is a rubber seal that is not glued. The wheels will attach using this seal, the remaining rollable.

Finishing the lower part of the body


With every piece of suspension in effect, the two pieces meet, which get painted radiator grille, and wheels and tires slide Customs This is a little nerve racking, because you have to pretty hard, and it seems like the suspension will Snap In the pressure. Actually, I had another Glue the rotors before that I was not completely dry when I glued.

Finishing the interior and exterior doors


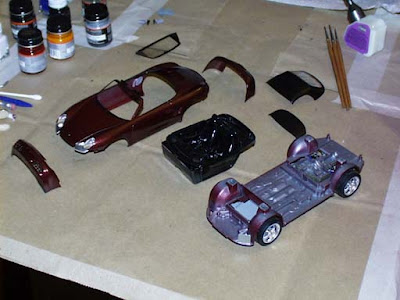
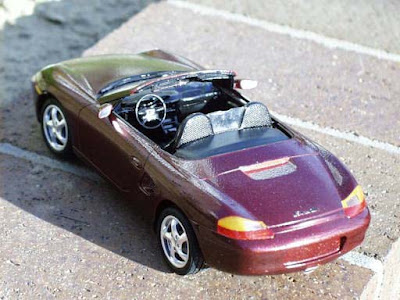
Once you remove the non-interior pieces from the grid, you can spray all of the interior pieces still on the grid. My interior is black, based on the work easier, I could just spray the whole thing black. Interior with other colors you need to spray the inside of color, and then hand paint on many small black spots in the cockpit.

This is also a good time to paint the hand from top to bottom tonneau pieces and the upper piece until soft. I did not bother painting the hard top, because I am not always. It is also a good time to the various black trim parts as the windshield, brakes and engine intake grilles, and the bumpers and fender flares.

Finally, there's still a fair amount of outside work to be done. The chrome and glass parts like headlights, taillights, windshield, rear-view mirror, exterior mirrors, etc. must be painted and / or glued.

For fear of a permanent error, I chose not to the interior section adhesive or upper body to the lower part of the body. The fit is tight enough to simply good.

For the rear deck Boxster logo, I only have a little black paint on a piece of paper and touched them in the light, the lettering. I did not want to screw it up by brushing up and get it in between the letters.

The stickers suck. I had little success getting them to stop. I have two of the wheel Cap stickers, and participated in a small adhesive for the hood badge stickers and sticker brake light, which is also a little too big.

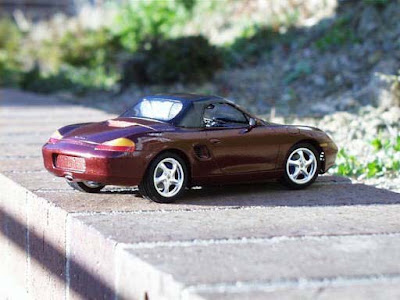
I left the soft top unglued, so that it lifts from the top down. It is not quite fit flush against the top of the windshield, but it could, if I had decided to permanently glue at the top of the soft.
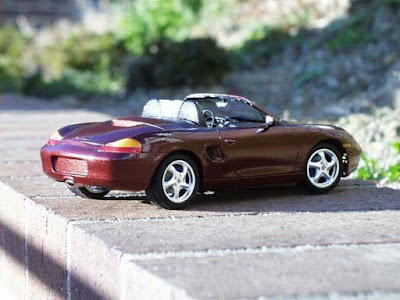
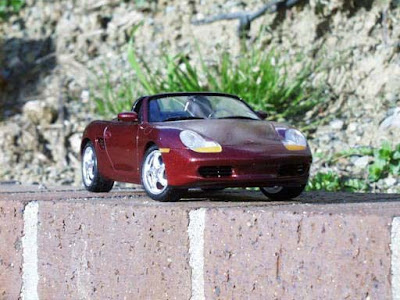
The final product!


Here are some photos I have a Olympus D-500L digital camera. Click on an image to the photo in full size. (Actually, they are half the size. The originals were 1024x768.)